

STAGE 1 (below)
Well
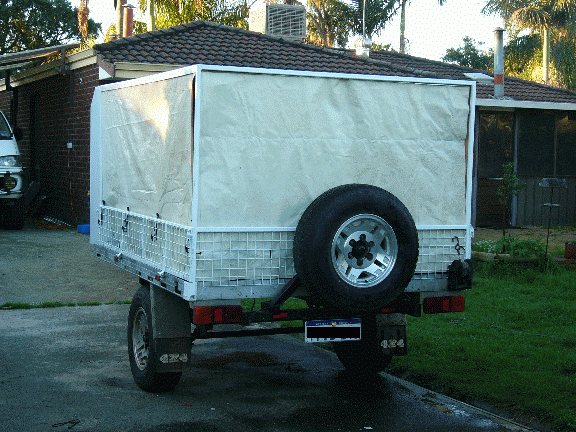
Its almost completed. My new trailer.
We've bought a couple of el-cheapo quadbikes and needed a trailer to
haul them around in.
I picked up an alloy tray from a 1 tonner ute and my good mate Neil and
I used that as the basis to build the trailer around. He's (officially)
a smart bugger. Great at fabrication, and has a really good workshop
too. Best of all, he lives around the corner from me (literally).
Step 1. make the tray width the same as the Delica (it was wider) it
was about 10 x 8, its now about 8 x 6.5.
Step 2.
Build a chassis. We wanted it to match the Delica's wheel tracks so it
was easier to tow offroad. I also sourced a few rims the same as the
Delica (thanks Baddad). There was a fair bit of drama getting the rims
onto the hubs as the wheel nuts are pretty much unique to those rims
(from a Toyota Surf) and so I had to get studs that matched, the only
ones I could get were a little too long, so I had to block them out at
the back with a washer.
We cut, bent, welded up the chassis, and in typically brilliant Neil
fashion he build the spare carrier with a spare hub, studs, bearings
etc, so if something breaks - we've got a spare of just about
everything.
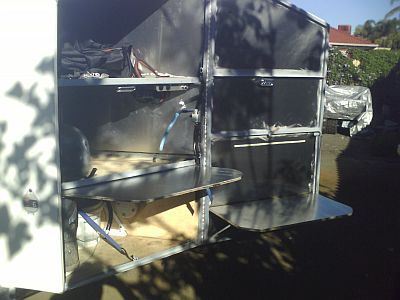
Step 3. Add the water tank. We've fitted a 55L water tank that I had
from a previous incarnation of the Delica's setup. The front shield for
the water tank folds up to become a small table.
The rims are 15x7 same as the Delica, the tyres aren't quite the same
being 225's. They'll transfer onto the Delica in a pinch though and
work fine.
Step 4.
I made up some ramps with the old sides from the tray. Thats the first
incarnation.
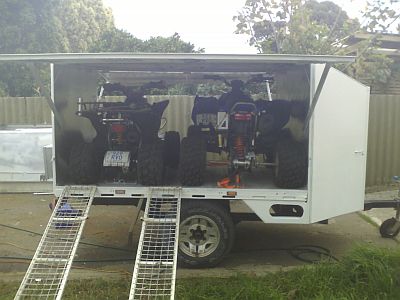
I added tie-down points (galore) and made up straps to hold the quads
(I used 80kg tiedowns, then folded them over 4 times and sewed them
together) one front and one back. Should be good for up to 600kg which
the quads certainly are not.
Step 5.
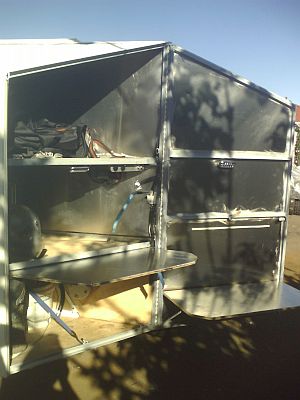
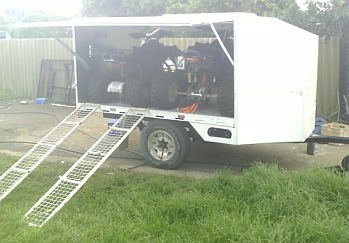
Make up a front locker, roof, new drop sides that become ramps. Mount a
boat winch on the back of it (and converted it to have a removable
handle) for hauling the quads onto the trailer by myself.
Sexy :-)


The door of the locker is made the right length that it meets up with the back door of the van. So when its open they form a roof. The drawbar of the trailer is extra long to allow the swingaway to be opened easily. The upsides of this is that its easier to reverse, and I'm able to reverse back to the point where the trailer is actually at 90' to the van!


Additional
tasks to complete:
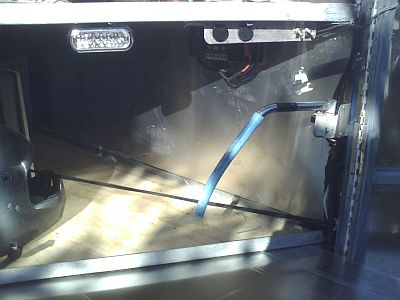
A small camera with IR capabilities will be mounted on the back of the
tray as I now can't see through the rear view mirror when towing. (DONE - works great!)
Now we're cooking :-)
A huge thankyou to Neil, for all his hard work and skill.
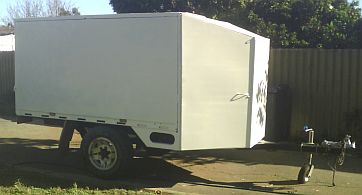
Well, after living with and using the trailer in that form we learned new things. Then when the canvas sides became tatty and in need of replacing it came time to make a decision or two.
1. The canvas sides I'd made originally were from scrap material, I didn't have anymore of that scrap so would need to get them made (exxy$$$). They flapped about a fair bit, catching the wind, and several times the elastics came off.
2. The trailer wasn't long enough for my two bigger quads to be on together (I bought a 300cc Predator copy - brilliantly well made quad compared to the other's I've had).
3. The front box was sooo NOT aerodynamic at all and so wasn't the most economical or comfortable thing to tow.
4. We can't fit everything we want to carry in the front box - we have a couple of items just too big to fit in it as it is.
5. It was a pain having to step over the draw bar all the time while using the kitchen.
Soooo, I decided to rebuild.
In order to keep the costs reasonable I decided to keep the existing roof and modify it to fit a new front box. Move the front box onto the draw bar in order to get the heavier items closer to the ground (getting the centre of gravity lower to keep it stable - did I mention I rolled the trailer a little while ago :-) ). Having done the sums, I worked out that it would cost less, not add too much weight, but add heaps more longevity and security to make hard, lockable sides. With a basic plan in my head (and on paper) I propped up the roof and cut the front box off and went to work.
Long story short - here's the results :-)
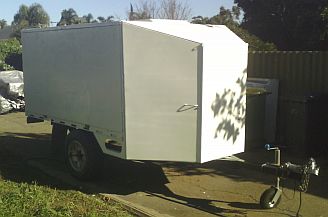
The front box has more space than the last one did. I also made a new annexe when I was given the top off a camper trailer. I modified that so it can be fit to either the trailer or the van making an excellent add-on room. We now have the versatility to our setup to have either the van, or the trailer act as base camp (or neither if we're wanting to stay easily mobile). This proved its worth on the last trip, where my trailer was used to ferry all our groups quads to the riding area (as my mates trailers are their bedroom's and base camps and so when setup - very difficult to move).
The front box also now creates down force while driving at speed which makes it very very stable and easy to tow. The sides not flapping has also made a huge difference - the trailer is much quieter to tow too.
There's also a toolbox on the back so if I need to balance the trailer I can add weight there (or just for storing extra stuff).
There's still a jerry can on the back, and I was going to add another to balance that one off but I don't like the construction of these bought jerry can holders so I may build a pair myself. For the moment its not needed as I rarely go through more than half a jerry can in a long weekend with the new quad (seems to just keep going and going on one tank of fuel!!!).
Since those photo's I've made the ramps fold in half. The ramps used to be the sides of the trailer, but with the trailer now longer and of course it having different sides, the old ramps did not fit neatly on the trailer as they were. I've also added a winch (hand) for pulling up the big quad (the auto you just use the motor to drive it up onto the trailer itself). Its usually not an issue to push it up, but after one ride, found it almost impossible to load the quad because we were in the middle of a big mud bowl we get any traction in order to push!
©